There are many reasons you may need to change a student's class. Perhaps they have gone up a level, or they need to change the lesson day or time. The most effective way to deal with this is to End the current Enrolment, and create a new enrolment for the new class.
1. Go to the "Student Information" screen. Under the "Current Enrolments" section, click on the "End Enrolment" button on the class that you wish to end for the student.


2. Select the "End Enrolment as at" date. We recommend your end date to be set as the day after the student's last attendance. For example if their last lesson was 01/04, end their enrolment on 02/04.
_____________________________________________________
Side note: If you need to end an incorrect enrolment, end the enrolment for the day before the start date.
Example: you had an enrolment starting on 20/04 but it was incorrect and you need to end it and redo it for different dates or a different class, end it for 19/04. (You can do this even if the date has passed).
IMPORTANT:
- If the enrolment that you want to "undo" already has attendance/s marked off, you must first change these attendances back to "Not recorded / blank" (from student screen Attendances, click "change attendance"), then you can safely end the enrolment before the start date. If you skip this step, these attendances will not be credited back.
- If you un-enrol a student and go to enrol them back into the same class, you will get a pop-up to say they are already in the class - ignore this if the re-enrolment into the same class is intentional.
- If you enrol, un-enrol, and re-enrol a student repeatedly into the same class and especially for the same dates or overlapping dates, you may cause an issue with the family finance / amount of credit. If you are at all unsure on how to un-enrol a student and enrol them back into a class, please contact Support and we would be happy to assist you.
_____________________________________________________
DO NOT TICK the exit box or exit reason unless the student is leaving the centre (e.g. moving away).
Click on the blue "Continue" button.


3. The next screen will show the remaining classes past the end date selected on the previous screen that the student has been invoiced. If you leave the classes ticked it will credit the money back to the family under the "Finance" section.
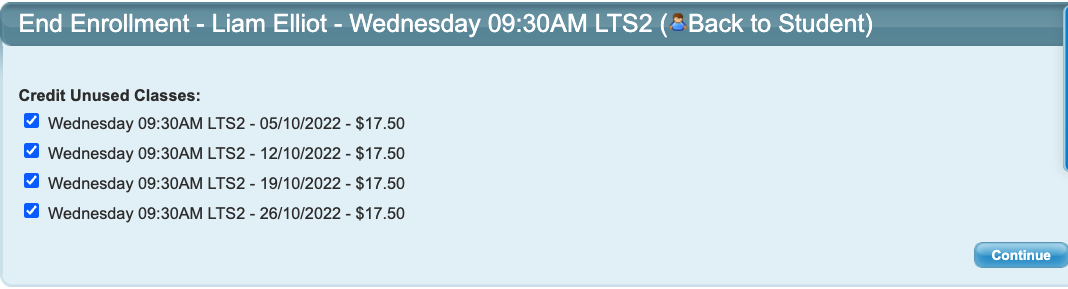
YOU NEED TO KEEP THE CLASSES TICKED AS THE CREDITS NEED TO GO BACK TO THE FAMILY ACCOUNT. Even if it is a $0.00 enrolment, you need to keep the boxes ticked as it is also linked with their attendances. If you do not tick the box/es, the lesson attendances will remain, and the invoiced amount will not be credited back to the family.
The only time you would untick the boxes is if you want the customer to still be billed for these lessons (eg. they might be withdrawing during the term and you do not offer refunds/credits).
Click on the blue "Continue" button.

Please Note: If you untick the boxes because you don't want the client to be refunded for these lessons, the student will still be un-enrolled however their attendances for the remainder of the billing period will remain. To remove these attendances you will need to apply a Non-Attendance reason such as Canceled Enrolment. To setup a non-attendance reason please read the article Creating Non-Attendance Reasons.
4. You will be arrive back on the student screen where you can begin the enrolment process to the new class.
e, you will now be back on the Student Record screen. Click on green "New Class Enrolment" button.


5. This will open a new window with days and times available for the student based on the student's assigned level. Click on the day and time of your new class.

6. You will now see the "New Class Enrolment" screen for that student.
a. Make sure the "Enrolment Start Date" is correct. This should be the date of their first lesson in this class.
b. Leave the "Enrolment End Date" as the default. Generally the student will stay in this class until they either change level, change day or time, then there is no need to touch the Enrolment End Date.
c. Check the class details are correct. (If not, go back).
d. "Hold Spot Until Start Date". Tick this box if there are one or more lessons in between the date you are enrolling the student, and the date they are starting lessons (e.g. you are enrolling on the 3rd of May and they are not starting until the 26th of May). This is really important to do if there is any kind of gap in timing. Why? Because it will hold a $0.00 place for the student and not allow any overbooking in the class.
For example, say a student is not starting for 3 weeks and you do not tick a hold spot, and they have taken the last place in that class. You may have another student book in within that 3 weeks and all seems fine, then you hit the next week where that original student booked in, and you are overbooked. If there is any kind of gap, tick the hold spot box!
e. Special Pricing. If you want to put in a special price, you have the option to do so here. You must both tick the box and enter the price in the field below that tick box (without the $). Maybe this is a special 0.00 enrolment - whatever the case may be. If you do not need a special price, leave this blank.
f. The "Default Price Structure" is from the class setup and cannot be changed here, but it will tell you what the student will be billed for - in the example below, it is "Learn to Swim".
g. "Price Structure Override" - here you have the option to override the Default Price Structure. Generally this is not needed and you would leave it set to "None / No Override". If you do need to do override, select the new price structure from the drop down menu.
Check the following information. You need to be very specific with dates as this will affect the customers billing. Make sure your end date of the previous class and the start date of your new class are not within the same week (a week is Monday to Sunday).

7. This will bring you to the next window to confirm your enrolment and allow you to select your price. If you've entered everything correctly with dates, you can leave it on "Automatic Calculation". However, we recommend you get all staff into the habit of selecting the correct price from the price matrix - this will ensure the correct lesson charge especially if you have discounts for multiple enrolments, even if dates are incorrect.

a. "Current Lesson Billing" will show any other current enrolments the student may have.
b. "Class name" is the current class you are enrolling the student into.
c. "Select Price for this Enrolment" - VERY IMPORTANT
NOTE: this selection is for the current billing cycle only. For the new billing cycle SimplySwim will calculate lesson values based on what you select here.
You can choose your pricing calculation for this enrolment by selecting either "Automatic Calculation" or selecting from the price matrix.
Automatic Calculation: SimplySwim will calculate the billing position based on Student Enrolments and number of other enrolled students in the family.
Price Matrix Selection: Select the position in the price matrix that you would like the enrolment charged at for the remainder of the current billing cycle.
This is where your selection of dates is so important. If the student is already in another class and you have ended their enrolment but not done this correctly, you could end up charging the second enrolment price rather than the first enrolment price (e.g. say the end date of the previous enrolment and the start date of the new enrolment are in the same week, the system will pick this up as a second enrolment for the one student and charge the discounted amount when in fact you want to charge the first enrolment price). If you want to make 100% certain that a family is charged the price you want regardless of dates that have been entered, select from the price matrix.
Click the blue "Save" button.
8. It will bring you back to the "Family Information" screen. Here you can see the student is now enrolled into the selected class.

NOTE ON HOLD SPOTS: If you have selected a "hold spot" for a student, they will have two enrolments showing for the one class - one is the free hold spot and one is the actual enrolment. When the date of the first class has passed, the hold spot enrolment will disappear from the screen.

You can check this by clicking on the student's name and under "Current Enrolments", the hold spot appears first with a Y (0.00) under "Special price".

9. Check the family finance is correct.
NOTE: Invoices are in date order, so if you are making a change after you have already run your billing, the previous system-generated invoice will appear last as it goes by the first lesson date. The changes you have just made, along with the lesson credits (if any) will appear earlier.
Last updated 4 May 2021
Was this article helpful?
That’s Great!
Thank you for your feedback
Sorry! We couldn't be helpful
Thank you for your feedback
Feedback sent
We appreciate your effort and will try to fix the article