Overview
Use this guide when a Student's enrolment has been ended but the finances and Attendances remain on their account.
Setup Guide
TABLE OF CONTENTS
Before You Start
Have a Non-Attendance Reason available for use that issues a credit (e.g. Enrolment Ended).
Refer to: How To: Create Non-Attendance ReasonsHow does this happen?
When ending an Enrolment, any Attendance dates remaining after the end date are displayed and ticked by default. This means the finance charges and attendances will be removed from the student when ending the enrolment.
If these boxes are all manually unticked in this process, the enrolment will still be ended but the Attendances and charges (if applicable) remain.
Two options are detailed below on how to deal with these remnant Attendances and finance charges.
Option 1 - Non-Attend (recommended)
This option credits back the Attendances to rectify the family finance and marks them with a Non-Attendance Reason to free up the Class space for make-ups. It does not remove the Attendances but provides a clear trail to track what has happened.
1. Go to the Attendance section of that Student and click on the yellow edit folder next to the remnant Attendance.
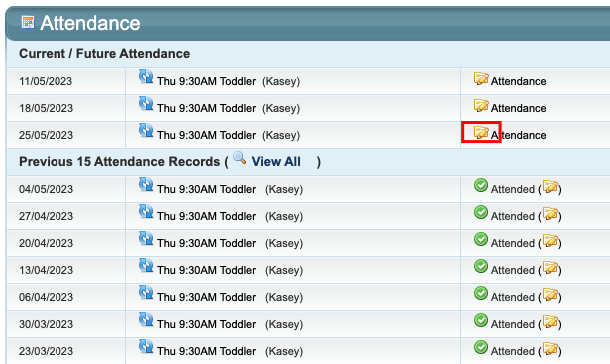
2. Select the appropriate Non-Attendance Reason to credit back the Attendance (e.g. Enrolment Ended) and click "Update".
3. Repeat for each Attendance that needs to be actioned.
4. If the Finance was previously manually adjusted, this will need to be counteracted.
Tip: Open each Attendance in a separate tab for fast action (Mac users: hold down command and click on the attendance; PC users: hold down control and click on the attendance).Option 2 - Credit and Cancel
This option "credits and cancels" the remnant Attendances. Use extreme care if using this option as the attendance is removed entirely and cannot be reversed. We do not recommend leaving this action configured as it cannot be reversed when used.
Step 1 - Configuration Setting
1. Go to Configuration → System Setup → System and tick the box "Show Credit and Cancel on Attendance".
Step 2 - Student
1. Go to the Attendance section of that Student and click on the red circle next to the remnant Attendance. Ensure you have selected the correct attendance date and class enrolment.

2. If correct, click "OK" on the pop-up to confirm the action.
3. Repeat for each applicable Attendance.
Step 3 - Configuration Setting
After completing all of the steps above on each applicable remnant attendance:
1. Go back to Configuration → System Setup → System and UNtick the box "Show Credit and Cancel on Attendance".
This is important to remove the red "Credit & Cancel" action as this appears on every attendance on both the Attendance and Student screens when configured.
Last updated 24 June 2026
Was this article helpful?
That’s Great!
Thank you for your feedback
Sorry! We couldn't be helpful
Thank you for your feedback
Feedback sent
We appreciate your effort and will try to fix the article