Overview
POS Items can be created for any items for sale (e.g. goggles) and any chargeable items (e.g. rego fees).
How-To Video
Setup Guide
TABLE OF CONTENTS
Before You Start
All POS Items need to be assigned to a Revenue Type and a POS Item Category.
Refer to these articles for assistance with these prerequisites:
How To: Configure or Edit Revenue Types
How To: Create or Edit a POS Item Category
How to Create a POS Item
1. Go to Configuration → POS Items and click on "Add POS Item".
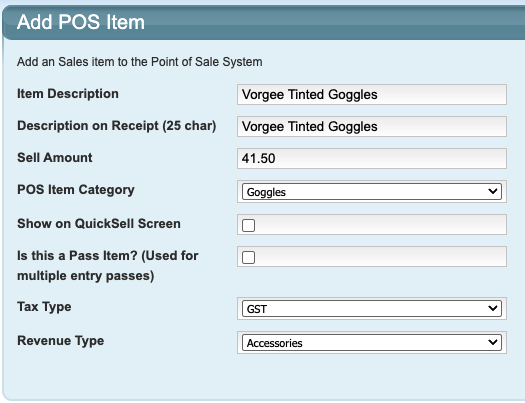
2. Complete the fields and click "Save".
Field | Response |
Item Description | Name of the item. |
Description on Receipt (25 char) | Name of the item - can be the same as above. Limited to 25 characters in length. |
Sell amount | Item cost without a currency symbol. E.g. 10.50 |
POS Item Category | Select the category from the dropdown. |
Show on QuickSell Screen | Ticked: The item displays on the main POS screen AND within the POS Item Category. This is intended to be used for high sell items so you can click on it on the main screen rather than having to click into the category first. Not ticked: Item only displays within the POS Item Category. |
Is this a Pass Item? (Used for multiple entry passes) | Tick: If the POS Item is a Pass, this must be ticked. Passes are not sold from POS. Do not tick if the item is not a Pass. |
Tax Type | Select the tax type for the item. |
Revenue Type | Select the revenue type for the item. |
Example
How to Edit a POS Item
1. Go to Configuration → POS Items and click on the name of the POS Item.
2. Edit the required details and click "Save".
How to Make a POS Item Inactive
1. Go to Configuration → POS Items and click on the name of the POS Item.
2. Select "Inactive" and click "Save".
Inactive items appear at the bottom of the POS Items screen.
To reactivate an item, click on the Item, select "Active" and "Save".
How to Delete a POS Item
POS Items cannot be deleted. Follow the steps above to make the category inactive.
Inactive items are not visible on the POS screen.
How to Enter an SKU / QuickCode for a POS Item
1. Go to Configuration → POS Items and click on the name of the POS Item.
2. Enter the SKU / QuickCode into the section at the bottom and click "Add SKU / QuickCode".
Tip: If you have a barcode scanner, click into the SKU field and then scan the item and click "Add SKU / QuickCode".
3. Click "Save".
Related articles - linking Inventory Items to POS Items
Inventory items can be created and linked to your POS Items for tracking of stock. This step is optional. Refer to:
Overview: Inventory and Stock Management
How To: Link POS & Inventory Items (Inventory Step 5)
Last updated 18 August 2026
Was this article helpful?
That’s Great!
Thank you for your feedback
Sorry! We couldn't be helpful
Thank you for your feedback
Feedback sent
We appreciate your effort and will try to fix the article