Overview
This article instructs how to set up a new User.
We recommend creating a User for each person needing access to the system. Each action can then be traced if needed and Users can be given different access depending on the assigned User Permission Group.Setup Guide
TABLE OF CONTENTS
Before You Start
Users need to be created by someone with Full Access.
Have the new User's name and a unique email address available for their login details. This can be a personal email address or a unique company email address.
How to Create a New User
1. Go to Configuration → User Setup → Add User.
2. Fill in all of the fields (mobile number is optional) and click "Add User".
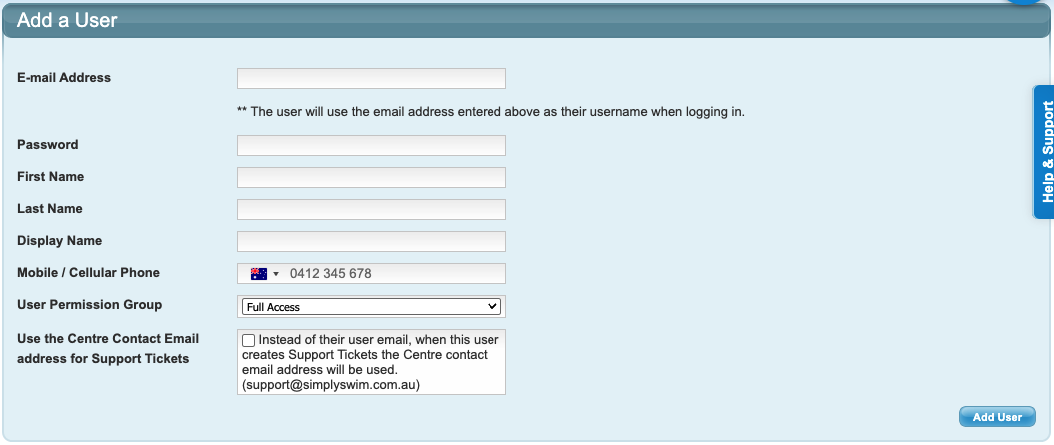
NOTE: A unique email address must be used. This will be the username when logging in. Recommendations on when to tick "Use the Centre Contact Email address for Support Tickets" check box: - Tick the box for general staff so return replies to help tickets go to the centre instead of a personal email address. - Do not tick for Managers / higher level staff as they may send in sensitive tickets for confidential reply that should not be returned to the centre's email address.
How do staff login?
All users login to your site URL.
Your site can be accessed from any laptop, computer, iPad, tablet or smart phone where there is internet access.
Tips to logging in:
- Create a bookmark at the main login screen in your web browser / desktop for fast access to login to your site.
- Never share passwords and do not save login passwords, especially on shared devices.
- Usernames and Passwords are case sensitive.
Removing Access / Deleting Users
When a User's access needs to be removed, we recommend making them inactive rather than deleting them.
When a User is made inactive, they cannot access your site. As a further protection you can also change their password.
To make a User inactive, go to Configuration → User Setup and click on the green tick ✅ for that User. This will turn into a red cross ❌ to show the User is now inactive and cannot access your site.
To delete a User, click on the red circle symbol to the left of the Username. It is best to only delete Users who will never be returning.
NOTE: Deleted Users cannot be re-added with the same email address. Contact Support with the User's details and email address if you need assistance reinstating a deleted User.
User Permissions
Permissions for different levels of access can be assigned to each User.
For instructions on how to set up or assign User Permission Groups, refer to: How To: Create, Edit or Assign User Permission Groups
Last updated 27 May 2026
Was this article helpful?
That’s Great!
Thank you for your feedback
Sorry! We couldn't be helpful
Thank you for your feedback
Feedback sent
We appreciate your effort and will try to fix the article